Page 5
The text at the top of this page isn't quite as clear as it could be. The paragraph should read:
Python doesn’t have quite as many complicated symbols, which can make other programming languages a lot more difficult to read and, therefore, a lot less friendly to beginners (which is not to say it doesn't use symbols - they're just not quite as heavily used as many other languages).
Page 30
The text describing embedding values should read:
If you want to display a message using the contents of a variable, you can embed values in a string using %s, which is like a marker for a value that you want to add later. (Embedding values is programmer-speak for “inserting values” - this is also referred to as string substitution)
Page 31
The text at the bottom of this page should read:
Once you’ve typed the code into the shell window, select File > Save As. Name your file myletter.py. You can then run the code (as we've done previously) by selecting Run > Run Module.
Page 44
The text at the bottom of this page should read:
To do so, we call the function Pen from the turtle module, which automatically creates a canvas (we'll learn more about what a function is later).
Page 62
The description of "assigning None" on this page is incorrect. It should read:
Assigning a value of None to a variable is a way of saying that the variable no longer has any value (or rather, it no longer labels a value). Setting a variable to None is also a way to define a variable without setting its value.
Page 76
The description of the break keyword is poorly worded. It should read:
The
breakkeyword is a way of jumping out of a loop (in other words, stopping it) immediately, and it works with bothwhileandforloops. Here it has the effect of jumping out of the block and would move to any commands that appeared after the linestep = step + 1.
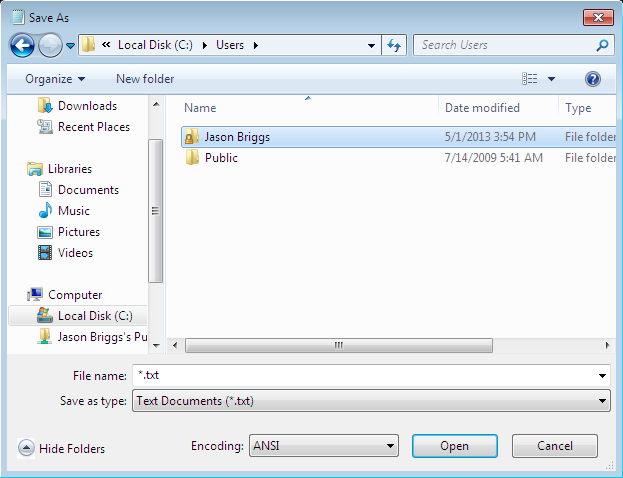
Page 107
The code in the first programming puzzle (#1) is incorrectly capitalised. The example should look like this:
>>> def left_foot_forward(self):
        print('left foot forward')
Page 123
The file example starting on Page 123 suggests saving the text file into the 'root' directory of the c: drive. That only works in earlier versions of Windows - in most current Windows versions, you'll get an error (usually "Access denied"). So step 4, in the instructions at the bottom of this page, should actually read:
When the dialog appears, select the C: drive by double-clicking My Computer and then double-clicking Local Disk (C:).
Double click on the folder labelled "Users", and then on your Windows username.
And the screenshot would then look something like this:
The code on Page 125 would then read:
>>> test_file = open('c:\\Users\\Jane Lawson\\test.txt')
>>> text = test_file.read()
>>> print(text)
If you’re using Windows, you saved test.txt to your user directory on the C: drive, so you specify the location of your file
asc:\\Users\\<your username>\\test.txt.
Page 127
When running the example to write text into a file, Python displays the number of characters written to the file - this doesn't appear in the book, which might confuse younger readers. The example should look like this (where 20 is the number of characters, in this case):
>>> test_file = open('c:\\myfile.txt', 'w')
>>> test_file.write('this is my test file')
20
Page 130
The text at the bottom of the page should read:
For example, suppose we have an Animal class, with an __init__ function that takes the parameters species, number_of_legs, and color.
Page 137
The text at the bottom of the page should read:
One of the differences between
inputand thereadlinefunction is that withreadline, you can specify the number of characters to read as a parameter (however, at the moment this only works in the Console, not when you're running in the Shell).
Page 180
The description of the coordinates used to draw the irregular polygon should read:
This code begins with the coordinates (200, 10), moves to (240, 30), then to (120, 100), and finally to (140, 120).
Page 182
The code here should have an underscore in the variable - so myimage should be my_image:
from tkinter import *
tk = Tk()
canvas = Canvas(tk, width=400, height=400)
canvas.pack()
my_image = PhotoImage(file='c:\\test.gif')
canvas.create_image(0, 0, anchor=NW, image=my_image)
Page 197
The text incorrectly states that when running the bounce code, the window will appear and then vanish immediately - which is why you need to add a main loop (or animation loop). This is true if you run the code using the Python console, however in the Shell (which is written using tkinter), there's already a main loop running (started by the Shell itself), so the window actually remains open.
Page 202
The text at the bottom of this page should read:
We’ll use this new object variable in the draw function to see if the ball has hit the left or the right side of the canvas:
(rather than "the top or the bottom" - thanks to Matthias)
Page 228
The text refers to the three platform images in the wrong order. It should read:
As with the stick figure images, save these in the stickman directory. Call the largest platform platform1.gif, the middle-sized one platform2.gif, and the smallest one platform3.gif.
Page 239
The code snippet at the bottom of this page incorrectly refers to the variable x1:
elif co2.x2 > co1.x1 and co2.x2 < co1.x1:
    return True
else:
    return False
Which should actually be:
elif co2.x2 > co1.x1 and co2.x2 < co1.x2:
    return True
else:
    return False
Page 241
The code snippets here also incorrectly refer to the variables x1, and y1. So the function within_x should actually read:
def within_x(co1, co2):
    if (co1.x1 > co2.x1 and co1.x1 < co2.x2) \
            or (co1.x2 > co2.x1 and co1.x2 < co2.x2) \
            or (co2.x1 > co1.x1 and co2.x1 < co1.x2) \
            or (co2.x2 > co1.x1 and co2.x2 < co1.x2):
        return True
    else:
        return False
The function within_y should read:
def within_y(co1, co2):
    if (co1.y1 > co2.y1 and co1.y1 < co2.y2) \
            or (co1.y2 > co2.y1 and co1.y2 < co2.y2) \
            or (co2.y1 > co1.y1 and co2.y1 < co1.y2) \
            or (co2.y2 > co1.y1 and co2.y2 < co1.y2):
        return True
    else:
        return False
Note that the exact same changes are required on the full code listing on Page 277 (at the bottom of the page).
Page 257
For clarity's sake, the summary of functions and classes should include the "collided" functions:
def within_x(co1, co2):
    ...
def within_y(co1, co2):
    ...
def collided_left(co1, co2):
    ...
def collided_right(co1, co2):
    ...
def collided_top(co1, co2):
    ...
def collided_bottom(y, co1, co2):
    ...
class Sprite:
    ...
class PlatformSprite(Sprite):
    ...
class StickFigureSprite(Sprite):
    ...
Page 267
The paragraph in the middle of this page should say False rather than True (see the bolded text):
The process of determining whether the stick figure has hit the top of the screen is very similar to the way we determine whether he has hit the bottom. To do so, at (4), we first see if the stick figure is jumping (y is less than 0), then we see if his y1 position is less than or equal to 0, meaning he has hit the top of the canvas. If both conditions are true, we set y equal to 0 at (5) to stop the movement. We also set the top variable to False at (6) to tell the remaining code that we no longer need to see if the stick figure has hit the top.
Page 287
The text at the bottom of this page should say video.quit rather than video.init:
At (8), we clean up using video.quit so that PyGame will shut down properly.